Introduction
In Part 1 we created a Silverlight control that enabled us to add pushpins to a Bing Map using JavaScript. In this part well use that ability to create a web part that will connect to a SharePoint list of location data and render that data as pushpins on the map.
The SharePoint Web Part
I developed the Silverlight control on my local machine so will be switching to a VM with SharePoint and the VSeWSS 1.3 extensions installed for this part. Open up Visual Studio and create a new SharePoint Web Part project. Ive called mine BingMapsWebPart because its late at night and I cant think of anything else. Ive also renamed the web part class to BingMap.
To render the Silverlight control within the web part we need to emit the same markup that we had in the Test Page created for us in Part 1. for cleanliness Ive stored most of the HTML tags, attribute strings and their values in a Constants class (you dont have to of course). The Constants class has been added to the project and looks like the following: –
public class Constants
{

    public const string Id = "id";
    public const string Data = "data";
    public const string Type = "type";
    public const string Name = "name";
    public const string None = "none";
    public const string Value = "value";
    public const string Width = "width";
    public const string Height = "height";
    public const string Border = "border";
    public const string Hidden = "hidden";
    public const string Visibility = "visibility";

    public const string HtmlDiv = "div";
    public const string HtmlObject = "object";
    public const string HtmlParam = "param";
    public const string HtmlIFrame = "iframe";

    public const string DivId = "silverlightControlHost";

    public const string ObjectData = "data:application/x-silverlight-2,";
    public const string ObjectType = "application/x-silverlight-2";

    public const string IFrameId = "_sl_historyFrame";

    public const string ParamSourceName = "source";
    public const string ParamSourceValue = "_layouts/BingMaps/BingMapWebPart.xap";
    public const string ParamOnErrorName = "onError";
    public const string ParamOnErrorValue = "onSilverlightError";
    public const string ParamOnLoadName = "onLoad";
    public const string ParamOnLoadValue = "onSilverlightLoad";
    public const string ParamBackgroundName = "background";
    public const string ParamBackgroundValue = "white";
    public const string ParamWindowlessName = "windowless";
    public const string ParamWindowlessValue = "true";
    public const string ParamMinRuntimeName = "minRuntimeVersion";
    public const string ParamMinRuntimeValue = "3.0.40624.0";
    public const string ParamAutoUpgradeName = "autoUpgrade";
    public const string ParamAutoUpgradeValue = "true";

    public const string GetSilverlightLink = "http://go.microsoft.com/fwlink/?LinkID=149156&v=3.0.40624.0";
    public const string GetSilverlightImage = "http://go.microsoft.com/fwlink/?LinkId=108181";
    public const string GetSilverlightAltText = "Get Microsoft Silverlight";

    public const string CssTextDecoration = "text-decoration";
    public const string CssBorderStyle = "border-style";

    public const string ScriptKeySilverlight = "silverlight_js";
    public const string ScriptKeySilverlightOnLoad = "silverlightOnLoad_js";

    public const string SilverlightScriptSource = "_layouts/BingMaps/Silverlight.js";

    public const string HtmlKeyMapLocation = "MapLocation";

}
The only two you really need to care about in here are ParamSourceValue and SilverlightScriptSource. The former is the relative path to the Silverlight .xap file we created in Part 1 while the latter is the path to the standard Silverlight.js file. In this example Ive copied both files to the LAYOUTS folder under the 12 hive on the SharePoint box. If you planning to put the files somewhere else be sure to update the values in the Constants class.
Back in our BingMap class set up some private and public properties: –
private Panel _controlHost;
private string _latitudeColumn = "Latitude";
private string _longitudeColumn = "Longitude";
private string _titleColumn = "LinkTitle";
private IWebPartTable _provider;
private ICollection _tableData;

[WebDisplayName("Latitude Column"),
 WebBrowsable(true),
 Personalizable(PersonalizationScope.Shared),
 WebDescription("The column from the list that stores the Latitude."),
 Category("Map Settings")]
public string LatitudeColumn
{
    get { return _latitudeColumn; }
    set { _latitudeColumn = value; }
}

[WebDisplayName("Longitude Column"),
 WebBrowsable(true),
 Personalizable(PersonalizationScope.Shared),
 WebDescription("The column from the list that stores the Longitude."),
 Category("Map Settings")]
public string LongitudeColumn
{
    get { return _longitudeColumn; }
    set { _longitudeColumn = value; }
}

[WebDisplayName("Title Column"),
 WebBrowsable(true),
 Personalizable(PersonalizationScope.Shared),
 WebDescription("The column from the list that stores the title for the information window."),
 Category("Map Settings")]
public string TitleColumn
{
    get { return _titleColumn; }
    set { _titleColumn = value; }
}
Above we have private properties for an ASP panel control (well have this run at the server side to enable us to check if the control has already been created), three private properties and their public accessors for setting the columns in the SharePoint list that we want to use for Latitude, Longitude and Title information and two private properties (_provider and _tableData) to allow us to consume the data from the SharePoint list.
The next stage is to create the markup for the Silverlight control. Well do this inside a CreateMapControl method as follows: –
private void CreateMapControl()
{
    if (_controlHost == null)
    {
        if (!this.Page.ClientScript.IsClientScriptIncludeRegistered(Constants.ScriptKeySilverlight))
        {
            this.Page.ClientScript.RegisterClientScriptInclude(this.GetType(), Constants.ScriptKeySilverlight, Constants.SilverlightScriptSource);
        }
        _controlHost = new Panel();
        _controlHost.ID = Constants.DivId;
        HtmlGenericControl obj = new HtmlGenericControl(Constants.HtmlObject);
        obj.Attributes.Add(Constants.Data, Constants.ObjectData);
        obj.Attributes.Add(Constants.Type, Constants.ObjectType);
        obj.Attributes.Add(Constants.Width, Unit.Percentage(100).ToString());
        obj.Attributes.Add(Constants.Height, Unit.Percentage(100).ToString());
        HtmlGenericControl paramSource = new HtmlGenericControl(Constants.HtmlParam);
        paramSource.Attributes.Add(Constants.Name, Constants.ParamSourceName);
        paramSource.Attributes.Add(Constants.Value, Constants.ParamSourceValue);
        HtmlGenericControl paramOnError = new HtmlGenericControl(Constants.HtmlParam);
        paramOnError.Attributes.Add(Constants.Name, Constants.ParamOnErrorName);
        paramOnError.Attributes.Add(Constants.Value, Constants.ParamOnErrorValue);
        HtmlGenericControl paramOnLoad = new HtmlGenericControl(Constants.HtmlParam);
        paramOnLoad.Attributes.Add(Constants.Name, Constants.ParamOnLoadName);
        paramOnLoad.Attributes.Add(Constants.Value, Constants.ParamOnLoadValue);
        HtmlGenericControl paramBackground = new HtmlGenericControl(Constants.HtmlParam);
        paramBackground.Attributes.Add(Constants.Name, Constants.ParamBackgroundName);
        paramBackground.Attributes.Add(Constants.Value, Constants.ParamBackgroundValue);
        HtmlGenericControl paramWindowless = new HtmlGenericControl(Constants.HtmlParam);
        paramWindowless.Attributes.Add(Constants.Name, Constants.ParamWindowlessName);
        paramWindowless.Attributes.Add(Constants.Value, Constants.ParamWindowlessValue);
        HtmlGenericControl paramMinRuntime = new HtmlGenericControl(Constants.HtmlParam);
        paramMinRuntime.Attributes.Add(Constants.Name, Constants.ParamMinRuntimeName);
        paramMinRuntime.Attributes.Add(Constants.Value, Constants.ParamMinRuntimeValue);
        HtmlGenericControl paramAutoUpgrade = new HtmlGenericControl(Constants.HtmlParam);
        paramAutoUpgrade.Attributes.Add(Constants.Name, Constants.ParamAutoUpgradeName);
        paramAutoUpgrade.Attributes.Add(Constants.Value, Constants.ParamAutoUpgradeValue);
        HtmlAnchor a = new HtmlAnchor();
        a.HRef = Constants.GetSilverlightLink;
        a.Style.Add(Constants.CssTextDecoration, Constants.None);
        HtmlImage img = new HtmlImage();
        img.Src = Constants.GetSilverlightImage;
        img.Alt = Constants.GetSilverlightAltText;
        img.Style.Add(Constants.CssBorderStyle, Constants.None);
        HtmlGenericControl iframe = new HtmlGenericControl(Constants.HtmlIFrame);
        iframe.Attributes.Add(Constants.Id, Constants.IFrameId);
        iframe.Style.Add(Constants.Visibility, Constants.Hidden);
        iframe.Style.Add(Constants.Height, Unit.Pixel(0).ToString());
        iframe.Style.Add(Constants.Width, Unit.Pixel(0).ToString());
        iframe.Style.Add(Constants.Border, Unit.Pixel(0).ToString());
        a.Controls.Add(img);
        obj.Controls.Add(paramSource);
        obj.Controls.Add(paramOnLoad);
        obj.Controls.Add(paramBackground);
        obj.Controls.Add(paramWindowless);
        obj.Controls.Add(paramMinRuntime);
        obj.Controls.Add(paramAutoUpgrade);
        obj.Controls.Add(a);
        _controlHost.Controls.Add(obj);
        _controlHost.Controls.Add(iframe);
        this.Controls.Add(_controlHost);
    }
}
Now thats a fair amount of code, but essentially all it does is build a control tree that has the same markup that we had in our Test Page. Now we need to craft our JavaScript function that we want to call when the Silverlight control has loaded: –
private void RegisterSilverlightOnLoadFunction()
{
    try
    {
        CreateMapControl();
        if (_tableData != null)
        {
            if (!this.Page.ClientScript.IsClientScriptBlockRegistered(Constants.ScriptKeySilverlightOnLoad))
            {
                StringBuilder sb = new StringBuilder();
                sb.Append("function ");
                sb.Append(Constants.ParamOnLoadValue);
                sb.Append("(sender, args) {");
                sb.Append("\r\n\t");
                sb.Append("var bingMapsControl = sender.getHost();");
                sb.Append("\r\n\t");
                foreach (DataRowView rowView in _tableData)
                {
                    string title = rowView.Row[this._titleColumn].ToString();
                    double latitude = double.Parse(rowView.Row[_latitudeColumn].ToString());
                    double longitude = double.Parse(rowView.Row[_longitudeColumn].ToString());
                    sb.Append("var l = bingMapsControl.content.services.createObject('");
                    sb.Append(Constants.HtmlKeyMapLocation);
                    sb.Append("');");
                    sb.Append("\r\n\t");
                    sb.Append("l.Title = '");
                    sb.Append(title);
                    sb.Append("';");
                    sb.Append("\r\n\t");
                    sb.Append("l.Latitude = ");
                    sb.Append(latitude);
                    sb.Append(";");
                    sb.Append("\r\n\t");
                    sb.Append("l.Longitude = ");
                    sb.Append(longitude);
                    sb.Append(";");
                    sb.Append("\r\n\t");
                    sb.Append("bingMapsControl.content.Communicator.AddLocation(l);");
                    sb.Append("\r\n\t");
                }
                sb.Append("\r\n");
                sb.Append("}");
                sb.Append("\r\n");
                this.Page.ClientScript.RegisterClientScriptBlock(this.GetType(), Constants.ScriptKeySilverlightOnLoad, sb.ToString(), true);
            }
        }
    }
    catch
    { }
}
This will emit the same JavaScript that we had in our test page. The major difference here is that were looping through each row in our SharePoint list and calling the AddLocation() method. In the overridden CreateChildControls() method add a call to our CreateMapControl function: –
protected override void CreateChildControls()
{
    base.CreateChildControls();
    CreateMapControl();
}
The only thing left to code now is the web part connection so add the following two methods to the web part: –
[ConnectionConsumer("Location Map Data")]
public void GetConnectionInterface(IWebPartTable provider)
{
    TableCallback callback = new TableCallback(ReceiveTable);
    _provider = provider;
    provider.GetTableData(callback);
}

public void ReceiveTable(object providerTable)
{
    _tableData = providerTable as ICollection;
    RegisterSilverlightOnLoadFunction();
}
Because the data connection works asynchronously our GetConnectionInterface method defines a callback method that will be executed once the data has been returned from the list. Once we have the data the callback function, ReceiveTable, can write the required JavaScript.
Now thats all we need to do to get the web part to function. This version (for brevitys sake) has zero error handling so before you put this thing anywhere near a non-development SharePoint machine make sure that you include some exception handling.
If you have the URL of a SharePoint site in the "Start browser with URL" field in Project Properties > Debug then you can hopefully just right-click the project in Visual Studio and select Deploy. Again, if youre going to a production environment youll want to package the web part code (plus the .xap and .js files from the Silverlight project) as a .wsp file.
What we need now is a SharePoint site (hopefully youve already got one of these lying around). If youve already got a list with location data then great. If not, then just create a new custom list with columns for Latitude and Longitude (both numbers).
Once youve got your Locations list add your web part and a list view web part to a page (new or otherwise). Youll need to set the height of the Bing Map web part in pixels to get it to show. What you should have now is a blank map of the world plus your empty Locations list. Go ahead and add some data into your list.
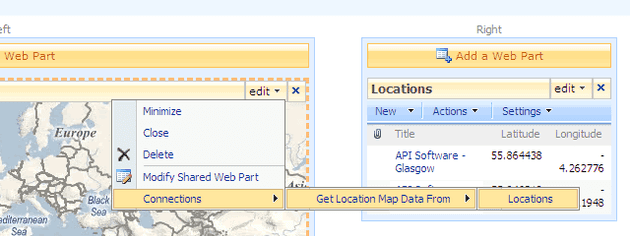
Once youve done that, change the settings on the Bing Map web part by clicking the menu arrow at the top right hand corner of the control and selecting Modify Shared Web Part. Once the page reloads in edit mode, check that the column names weve defined in the map web part match those in the locations list. In the right-hand panel in edit mode expand the Map Settings section and ensure the values in the Latitude, Longitude and Title Columns fields are valid column names in your list. Then, click the edit menu arrow at the top right of the control and select Connections > Get Location Map Data From > Locations (or whatever your list happens to be called). The page will reload again and this time you should see pushpins on the map at the latitude and longitudes specified in your list. Click Exit Edit Mode in the top right to view the page.
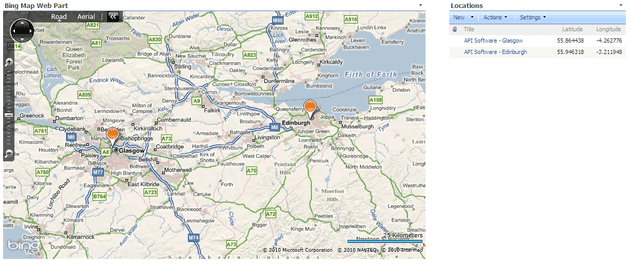
The final result should resemble something like the following (I've zoomed in so that we can distinguish between the Glasgow and Edinburgh pushpins).

